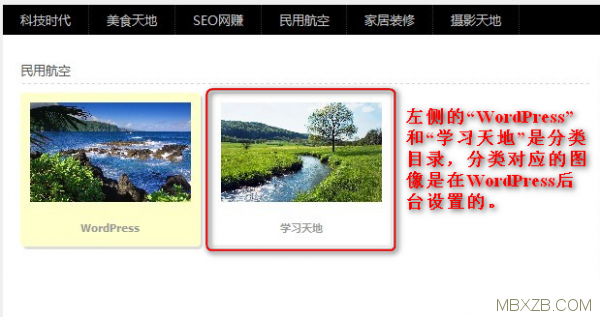
在做wordpress主题开发的时候,突然被客户要求做一个页面,来展示所有的分类,且分类还是要图片形式的来展示,话说做音乐类站,分类确实需要做个类似封面的分类图像才行,可是特么的wordpress分类目录设置里值有标题、别名和描述,在描述里又不能加图片代码。。。总么办?其实我在《WordPress分类目录添加个性化图像功能扩展(一)》 里面有讲到。。。而这篇文章就涵盖了,上面说了做一个页面,来展示所有的分类,且分类还是要图片形式的来展示 好吧,我给个图你就能够理解了!
下面就直接上教程吧,首先,打开你wordpress主题文件夹下的functions.php文件夹,然后将下面的代码放入:
- <?php
- global $texonomy_slug;
- $texonomy_slug='category';
- add_action($texonomy_slug.'_add_form_fields','categoryimage');
- function categoryimage($taxonomy){ ?>
- <div>
- <label for="tag-image">分类图像</label>
- <input type="text" name="tag-image" id="tag-image" value="" /><br /><span>请在此输入图像URL地址。</span>
- </div>
- <?php script_css(); }
- add_action($texonomy_slug.'_edit_form_fields','categoryimageedit');
- function categoryimageedit($taxonomy){ ?>
- <tr>
- <th scope="row" valign="top"><label for="tag-image">图像</label></th>
- <td><input type="text" name="tag-image" id="tag-image" value="<?php echo get_option('_category_image'.$taxonomy->term_id); ?>" /><br /><span>请在此输入图像URL地址。</span></td>
- </tr>
- <?php script_css(); }
- function script_css(){ ?>
- <script type="text/javascript" src="<?php bloginfo('template_url'); ?>/js/category-image_thickbox.js"></script>
- <link rel='stylesheet' id='thickbox-css' href='<?php echo includes_url(); ?>js/thickbox/thickbox.css' type='text/css' media='all' />
- <script type="text/javascript">
- jQuery(document).ready(function() {
- var fileInput = '';
- jQuery('#tag-image').live('click',
- function() {
- fileInput = jQuery('#tag-image');
- tb_show('', 'media-upload.php?type=image&TB_iframe=true');
- return false;
- });
- window.original_send_to_editor = window.send_to_editor;
- window.send_to_editor = function(html) {
- if (fileInput) {
- fileurl = jQuery('img', html).attr('src');
- if (!fileurl) {
- fileurl = jQuery(html).attr('src');
- }
- jQuery(fileInput).val(fileurl);
- tb_remove();
- } else {
- window.original_send_to_editor(html);
- }
- };
- });
- </script>
- <?php }
- add_action('edit_term','categoryimagesave');
- add_action('create_term','categoryimagesave');
- function categoryimagesave($term_id){
- if(isset($_POST['tag-image'])){
- if(isset($_POST['tag-image']))
- update_option('_category_image'.$term_id,$_POST['tag-image'] );
- }
- }
- function print_image_function(){
- $texonomy_slug='category';
- $_terms = wp_get_post_terms(get_the_ID(),$texonomy_slug);
- $_termsidlist=array();
- $result = '';
- foreach($_terms as $val){
- $result .= '<div style="float:left; margin-right:2px;"><a href="'.get_term_link($val).'"><img height="22px" title="'.$val->name.'" alt="'.$val->name.'" src="'.get_option('_category_image'.$val->term_id).'" /></a></div>';
- }
- return $result;
- }
- add_shortcode('print-image','print_image_function');
- ?>
新手需要注意的是,将以上代码加入到functions.php文件的时候,看是否需要去掉头尾的
很多新手都是因为未去掉头部,造成了网站打不开的情况,至于老手,求别打我,我是大叔我罗嗦!
代码加入后,就会出现下图的效果

最后,运用到wordpress主题里,将下面的循环加入你想要现实的位置
- <?php
- $categories=get_categories($args);
- foreach($categories as $category) {
- if ( get_option('_category_image'.$category->term_id) ){
- echo '<div><a href="'.get_term_link($category).'"><img title="'.$category->name.'" alt="'.$category->name.'" src="'.get_option('_category_image'.$category->term_id).'" /></a></div>';
- }
- echo '<div style=" text-align:center;"><a href="' . get_category_link( $category->term_id ) . '" title="' . sprintf( __( "View all posts in %s" ), $category->name ) . '" ' . '><b>' . $category->name.'</b></a></div>';
- }?>
最终的大体效果就如文章第一张图所示!
温馨提示:本文最后更新于2019年3月19日,已超过 2 年没有更新,如果文章内容或图片资源失效,请留言反馈,模板下载吧会及时处理,谢谢!


")
 本站安全防护由创宇云安全提供。